Thursday, October 29, 2009

Mold Making and Casting Exercise: Mutation . . . . . in three phases


Robert Gober, "Untitled"

Mon/Tues class: Due Tuesday, November 23rd
Thurs/Fri class: Due Friday, November 19th

For this assignment you will be expected to “mutate” an existing object or group of objects in three distinct phases. The mold making and casting techniques taught in this class should be used in at least one of those steps. You are strongly encouraged to begin working on this assignment without having planned or predicted your final result. Think of each phase as a separate experiment, and let the results from the previous stage determine your next course of action. Work progressively and intuitively.

These projects should be installed in the sculpture gallery, cell space or sculpture “box” by the afternoon of their due date for a group critique. You must decide if your final object is a table-top, floor-standing or wall-mounted sculpture, and display it accordingly. The use of a white pedestal is forbidden for this assignment.

The intent of this assignment is to teach you some very basic information about plaster and silicon mold-making, as well as life-casting with plaster gauze. Your goal should be to learn how to properly make a two-part plaster mold and avoid undercuts, and to familiarize yourself with the many different materials that can be used for casting, such as plaster, wax, soap, sugar, and anything else that can change from soft to hard (cake batter?).

The focus of this project is on both the craft and content of your final object, and the way in which it is displayed. Pay attention to the details!

You will be supplied with mold clay, plaster, silicon, wax and plaster gauze. You will be required to supply any other materials you think are necessary for your individual project.

Suggestions and things to consider:

First: choose an object (or small group of objects) that you’d like to “mutate”.

Second: Choose to either make a mold and cast that object in a new material, or to mutate it in some way. Suggested mutation techniques: wrapping, carving, bending, deconstructing, combining, stacking, dissecting, smashing, disfiguring, sanding or wearing away, melting, etc.

Third: If you made a mold as your second step, now is the time to mutate, or vice versa.

Fourth: Repeat step two.

Fifth: Now decide how you will display this object (or group of objects). Consider its scale. Should it be on the floor, hanging on a wall (or sitting on a shelf on the wall), or resting on another object such as a table?

(Note: mold making and casting are one phase. They will not be considered two separate phases!)

This project is due in three weeks! One phase must be completed each week!

Monday, October 19, 2009

Untitled


9.5" x 18" x 5"
Wood, motor, wire, hammer

Thursday, October 15, 2009

Untitled

22" x 17" x 9 1/2"
wood

Turner Gallery Exhibition: Wearable Sculpture and Performance

Due Friday, October 30th


Ann Hamilton, "untitled (body object series) #5-bushhead"

Your assignment is to make a wearable sculpture that will be worn for the duration of the exhibition in the Turner Gallery on October 30th. Your performance of the object (your movement and behavior while wearing it) will be just as important as the craft of the object itself, and will account for 50% of your grade for this project. Do not let the performance become an afterthought; consider it as a main element of your design.

Other than being worn on your body, your sculpture may also incorporate the performance environment and invite audience participation. Don’t forget: this will be a dance party! There will be loud music, dim lighting and potentially lots of people. How will your sculpture be designed for such an environment? How can your everyday perception or opinion of college dance parties play a role in that design?

The intent of this assignment is to teach you some very basic soft sculpture techniques, including paper-making (stretching paper over a metal armature) and sewing. You will be required to incorporate at least one sewn fabric element into your project. You are also welcome to incorporate other techniques or processes into your sculpture, such as felting, knitting, crocheting, or paper mache.

Available tools and materials: sewing machines and supplies, hand sewing needles and thread, batting for stuffed elements, 1/4” steel round stock for welded armatures, pliable aluminum armature wire, chicken wire, plaster gauze, abaca paper pulp.

Suggestions and things to consider:

Object. You are wearing the sculpture. Therefore, YOU are essentially “the object”. Do you want people to see or recognize you? Is your persona/sex/race important? Are you terrified of performing? If so, consider covering your face or collaborating with your fellow classmates.

Form. How will the object’s form encourage or prevent a particular kind of movement? Will you be able to move on your own or will participants need to assist you in some way?

Scale. Keep in mind that there will be 25 students/performers in the room, not including the audience. The space may get crowded, especially if it becomes a successful dance party.

Space. How will the object interact with the space and everything occurring around it? Is it designed for a specific part of the room? Is a part of the space altered in preparation for or during that interaction? Does it create its own sense of space in some way?

Remember… this piece will be part of a public exhibition. Take it seriously.

Wednesday, October 14, 2009

Bad Plaid


26"x 3 1/2"x 4"

plaid fabric, wood,
motor, round stock,
steel hinge

Friday, October 9, 2009

fisher king


16" x 20" x 1-3.5"
acrylic, salt, epoxy, and glue on canvas; motor, 1/4" round stock, & sculpting clay.

Hajimemashite (Greetings)


24" x 24" x 4 1/2"
wood, steel wire, copper wire, acrylic paint

Untitled


15" x 12" x 2 1/2"
Wood

Disaster (Oh shit)


17"x 6"x 8"
wood, motor, steel

"Humble Carousel of Snow and Earth"


17" (50" from the ground to the bottom of the project) x 8" x 9 1/8"


Wood, foam core, wire, motor + extension, string, straws, metal

"Shake and Pop"


15 3/4" x 5" x 13 3/4"


Wood

"Say Cheese"

The Necklace


(Size not yet measured)

foamcore, wood, packing tape, acrylic paint, electric motor, hot glue

Thursday, October 8, 2009

Self-Portrait


25 1/2" x 24" x 8"
Steel, scrap, hinges, fishing line, electric motor, masking tape

Somtimes If the Ball Gets Stuck You Could Help it Along by Pulling the String: If You Don't the Pegs Might Break


50" x 32" x 7"
Wood, Yarn, Plexiglass, Button, 12 Volt Motor

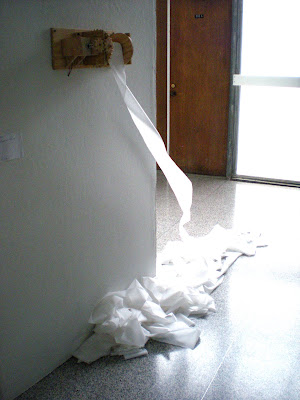
Twenty Three Point Six Plus One


54" x 15" x 5.5"
Wood, toilet paper, 12 volt motor

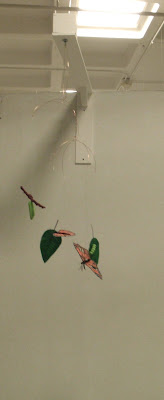
"Metamorphosis"


38'' x 25'' x 25''

copper wire, wood, paint, tissue paper,card stock, pipe cleaners, motor, and AC adaptor

Transmutation Project Research

Mon/Tues class: Due Monday, October 19th
Thurs/Fri class: Due Thursday, October 15th

“So we made ourselves into a society for asking questions. One of us was to visit a man-of-war; another was to hide herself in a scholar's study; another was to attend a meeting of business men; while all were to read books, look at pictures, go to concerts, keep our eyes open in the streets, and ask questions perpetually. We were very young. You can judge of our simplicity when I tell you that before parting that night we agreed that the objects of life were to produce good people and good books. Our questions were to be directed to find how far these objects were now attained by men. We vowed solemnly that we would not bear a single child until we were satisfied."
-Virginia Woolf 


Your assignment for Midterm Break is to think about the transmutation project. You have now learned 3 very concrete skills: woodworking, welding, and how to power and translate the motion of a low RPM motor. You will be learning 2 more skills when you return from break: sewing and soft sculpture, and plaster mold-making and casting.

You should:

1. Look closely at the world and the objects around you and get inspired. Ask questions.

2. Attempt to answer this question: If your work was a finger, what would it be pointing to?

3. Do research. Look up the artists that I recommended on your last round of sketches.

4. Print your research out, and paste it into your sketchbook. Write down your thoughts.

5. Choose one of the 3 ideas you proposed in your last round of sketches, and come up with 5 versions of that one idea. For instance, if I recommended you focus your brainstorming on a particular material, choose the material that you find most intriguing and come up with 5 different things you could do or make with it. Make 5 sketches based on that one idea (either 2D drawings or small 3D models), to be handed in when you return from break. Those sketches may be supplemented with explanations if you feel your drawings or models are difficult to understand on their own.

6. Photocopy your sketches (or photograph and print out pictures of your 3D models, to hand in along with the objects). You will be handing them in to me upon your return.

Think of this as a project proposal for a show you were invited to participate in. Challenge yourself to communicate your ideas clearly (even if they are not conceptual, but are instead formal investigations of a particular material or process).

Monday, October 5, 2009

ON/OFF


4' 6" x 19" x 6"
mixed media, dress, motor

8" x 5 3/4" x 3"
cardboard, light switch, cloth, pins

Birds and the Bees


Barbie, G.I. Joe, Motor

Contingent Caterpillar


36"x 6" x 18"
Mixed Media

Puppet Master

13"x13"x2"
Wood, Nails, Wire, Hemp

Ugggh


3' x 3'
Metal

What The Hollow Holds


24'' x 12" x 12"
wood, glue, pencil

Saturday, October 3, 2009

Biggest Fan


23"x 26" x 36"
Steel, Sheetmetal